Voluptatibus temporibus nulla aut id nostrum est ad.
Cupiditate nobis accusantium aut aliquid quasi.
Quis voluptatem sit alias dolor doloremque numquam.
Expedita eum recusandae non in ea reiciendis.
Voluptate modi nesciunt et veniam quo amet at veniam.
Incidunt co
Have you ever thought virtual reality could also play a role in your courses? Would you like to make your lessons more interactive? Do you want your teaching methods to meet the information and perception needs of the latest generations? MaxWhere spaces can support higher education projects and serve as inspiration for university teachers and other adult education professionals.
Let us explain the why & the how.
MaxWhere: learning can be more fun and organised
MaxWhere was developed by a team of university researchers and education experts and has been tested in many higher education institutions over the years. MaxWhere is a versatile platform streamlining information processing by displaying 3D virtual spaces with various themes and designs. The best part is that no VR glasses or other devices are needed to access these spaces. The 3D spaces provided by MaxWhere can be utilised not only in higher education but for multiple purposes, including work-related tasks such as project management, data visualisation, administration, and decision-making flows, as well as for education, event management, exhibitions, presentations, and product showcases.
Organise related course materials & assignments in one 3D space
For educators, MaxWhere offers 3D spaces with the most diverse design and architecture that can facilitate online classes, student interactions, systematisation of course materials, simulations, and exercises for universities and other educational institutions.
Our mission is to support education with modern technologies, so we offer our spaces for educators at an exceptionally favourable price, with an excellent price-value ratio.
3D spaces for more exciting and effective education
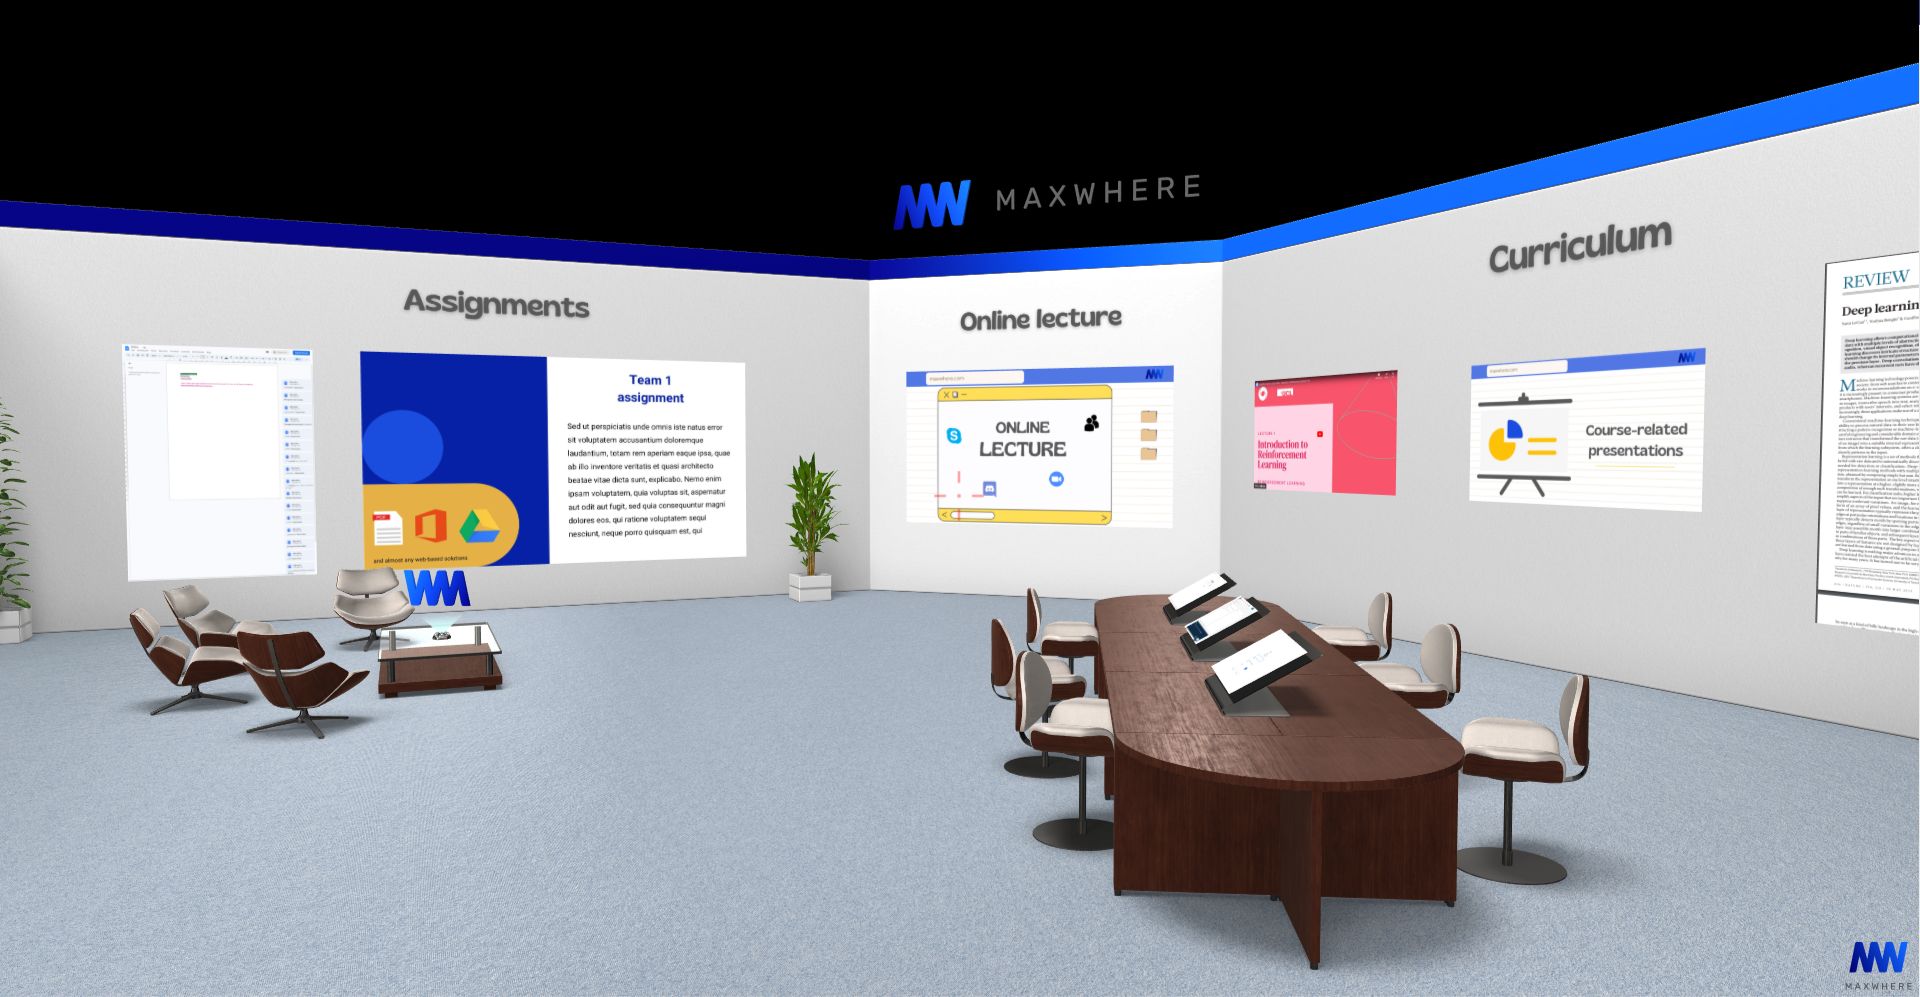
MaxWhere spaces provide a significant advantage. The lecturer can organise all the necessary curriculum materials, exercises, and tools in a single space, optimising cognitive processing for better understanding, insight, and content recall. Furthermore, students can customise their view of the space using the projects without altering the instructor's settings.
One of our Demo spaces - Put on SmartBoards and turn your lecture into an immersive experience
Every teacher's nightmare is an online class when ten or more minutes are wasted because students can't find the course material and exercises or they search in a hurry for the right file. Sometimes they can't collaborate because they are editing documents offline.
MaxWhere can accelerate work processes, making it especially beneficial for educational purposes. Well-designed spaces offer effective learning paths and only contain content that passes a preliminary instructor screening. Therefore, users can work from authentic sources. MaxWhere enables the integration of various educational applications into the same 3D space and displays them on Smartboards, reducing the need for context switching and saving time and energy. Each Smartboard functions as a separate monitor, and various file types, including websites, can be displayed. Furthermore, it provides:
A cloud-based service.
Making files immediately available in the given VR space.
Eliminating the need to send them to the students.
Features beyond education
MaxWhere can provide you with more than a lecture space. Some spaces can be an inspiration for those who are planning a conference, career expo, academic student meeting or similar event.
Navigation in MaxWhere spaces is user-friendly and requires only the usual mouse, keyboard, or touchpad movements. The lecturer can set guided tours that lead the user through the lesson/course/presentation and related materials, presenting the contents in an order deemed useful for students. Users can deviate from the route as needed, for example, if they are already familiar with the subject matter and are searching for particular content.
MaxWhere spaces enhance information acquisition and facilitate collaboration, making them highly beneficial. MaxWhere offers spaces designed for specific needs, such as conferences, talent management programs, professional meetings, career guidance programs, and more. Interested users can browse these spaces by clicking on the Education category on the Space Selector screen.
Ready-to-use educational projects in MaxWhere
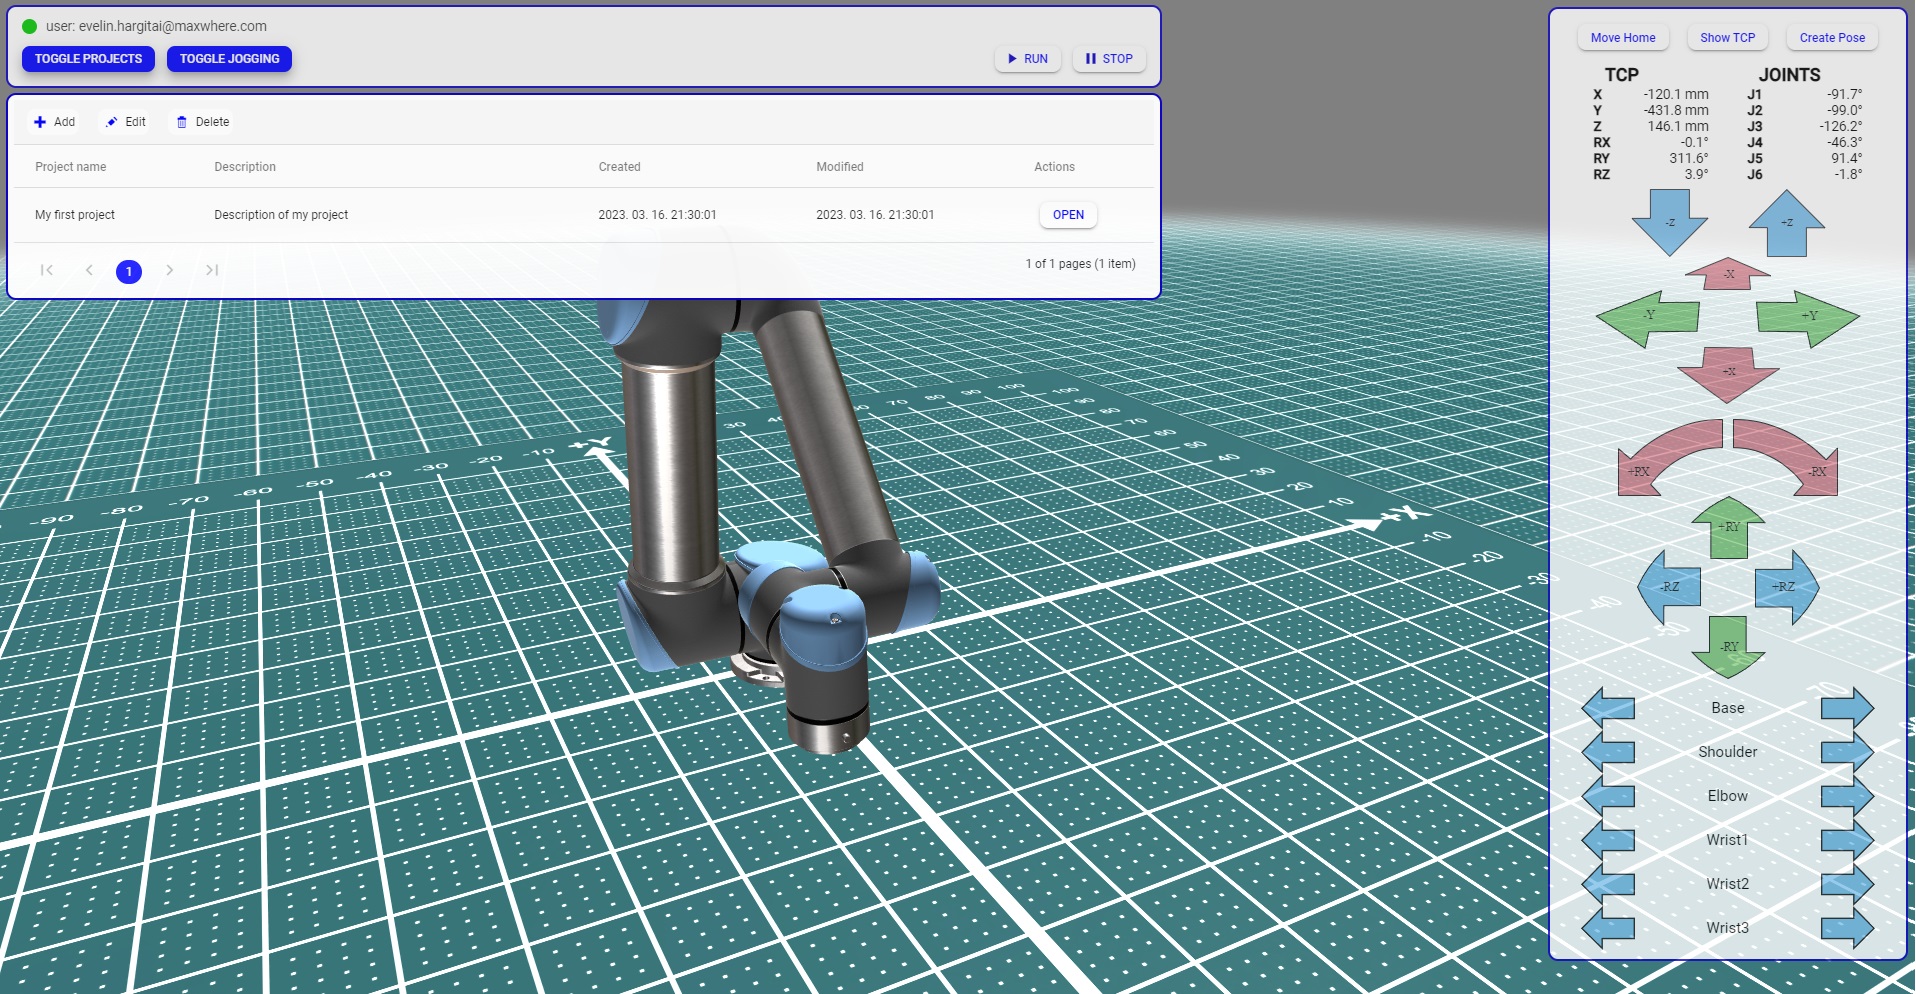
You can choose any of our spaces for online education and virtual classes. The design of the spaces helps you find inspiration. However, some specific 3D spaces help you teach some particular educational material. Among these, we recommend the simulation spaces for teaching physics, robotics and 3D printing. Roblocky is a space that models a robotic arm's movement, displays the control software's user interface, and helps practice.
3D printing is a space that simulates 3D printing so that students can learn the basics of 3D printing without expensive (real-life) equipment and supplies. Virtual pendulum space: in this space, students can study the pendulum movement from the theoretical physical foundations through the simulation of the pendulum to the calculations.
Easy to use digital twin of a robotic arm - practice & learn without real equipment
How to start?
The first step is to register a user account on maxwhere.com. Once you have created an account, you can visit portal.maxwhere.com, which is a web-based management site that allows you to view all the spaces you have access to. Depending on your permissions, you can be an Owner, Editor, or Viewer of a particular space. On the MaxWhere Portal, you can edit the metadata associated with your spaces, including their name, description, thumbnail, visibility, and sharing options, among other things.
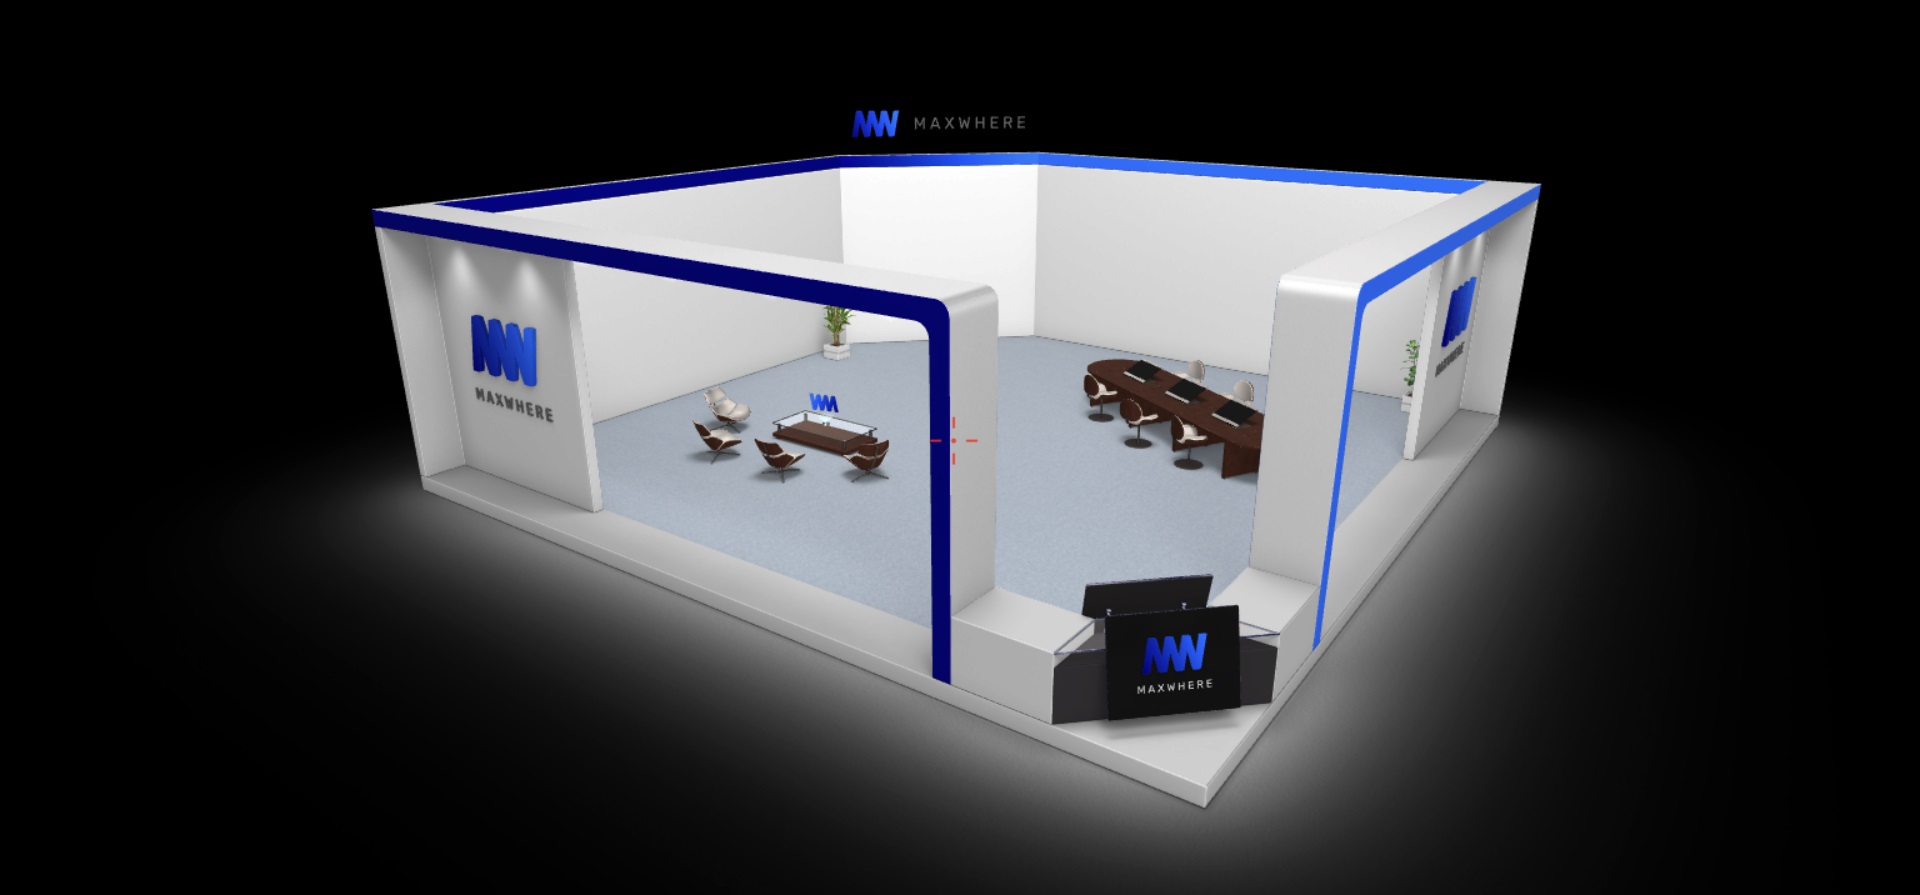
If you are an educator interested in using MaxWhere, we recommend that you start by exploring the Easy Lecture space. This space is available online, without requiring you to download the MaxWhere Desktop app, and allows you to organise study materials for one or more subjects easily. You can display course topics, notes, and diagrams on Smartboards and hold online classes that can be made available for students to watch later. Students can also arrange their notes and submit homework according to their individual needs, making it easier to find everything in one place.
Step by step guide for lecturers
Tutorials – choose what is more suitable for you
You can choose to read our user manual, watch our tutorial videos, or enter a space and follow our guide, which is available in each space. The choice is yours. And you can even read our blog with many valuable articles about MaxWhere's features. Begin with our tutorial for educators and continue with our tips about Smartboard editing.
Get your own space
First, visit the MaxWhere portal and click on All Spaces or My Spaces in the top menu bar. Now you can see the big + icon, click on it to get to the editing interface. Choose which space you want to copy for yourself, and when it's done, it's just a few simple steps and you can enjoy your own space.
Space Browser and Navigation in 3D spaces
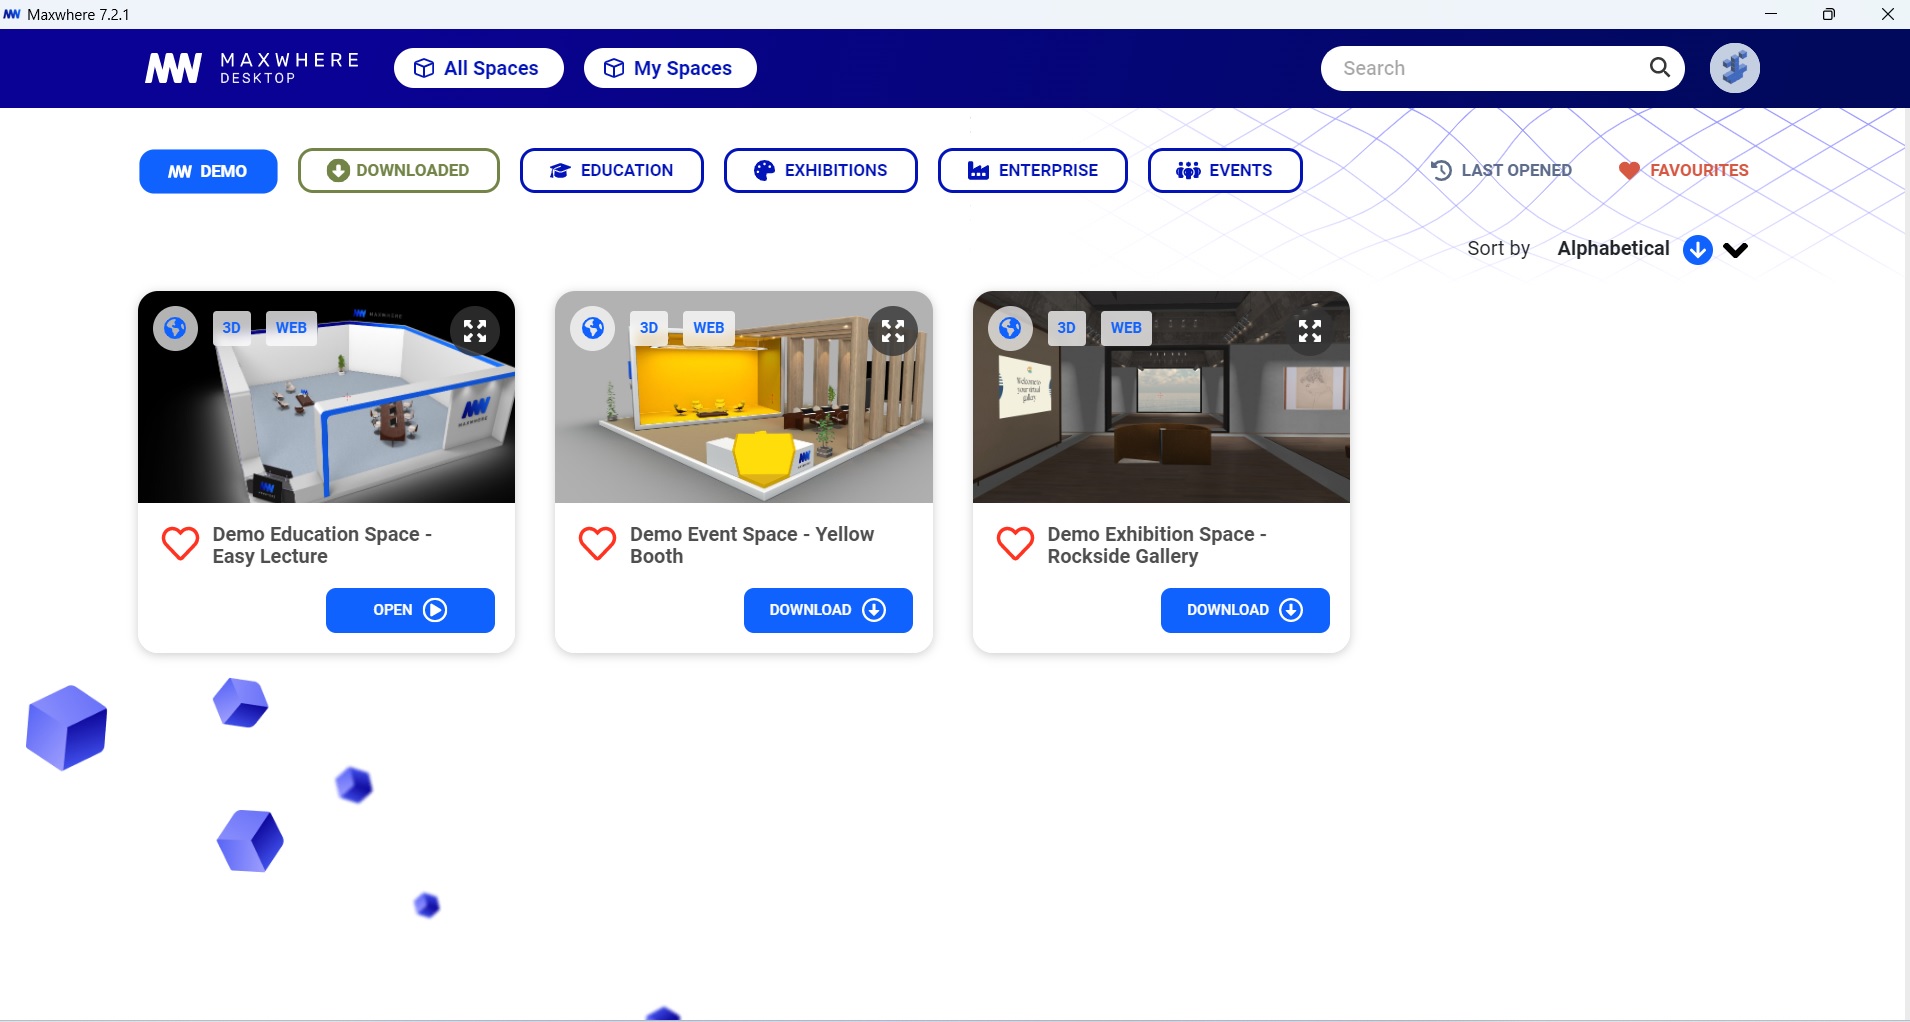
The Space Browser is the first interface you find on the MaxWhere portal or the Desktop app. Here you can select the space you want to enter. You can search by keyword in the search bar, and you can also find your own spaces here.
The space browser and some of the demo spaces
When you enter a space on MaxWhere, you can navigate within it as if you were playing a video game. You can use a mouse, touchpad, keyboard, or even a touchscreen to move around. Navigation is intuitive, but if you need help, you can refer to the User's Manual. Within the 3D space, you will find smartboards and selection panels that you can interact with. You can easily switch between 3D and 2D navigation modes by clicking the right mouse button. In 2D mode, you can use a regular 2D cursor to interact with the MaxWhere menu or other applications. In 3D mode, you can change the camera's viewpoint inside the 3D space.
If you ever feel lost within a space, press the 'Backspace' button on your keyboard, and you will be taken back to the original viewpoint from when you first opened the space. This makes exploring different parts of a space easy without getting disoriented.
Instead of whiteboards: Smartboards and selection panels
Smartboards are panels that are integrated into 3D spaces on MaxWhere, and can be activated if you have the appropriate privilege. Once you enter a smartboard, you can upload local 2D content like PDFs, images, and videos, or load webpages and cloud-based content. Even if a smartboard is set to view-only for a user, they can still enter and interact with the content displayed inside. Smartboards are useful for displaying images or creating joint works with students online.
Smartboards serve as the primary interface for accessing the 2D web and collaborating with other users inside and outside of MaxWhere through cloud-based collaborative services. Numerous variants of Smartboards are available, and the MaxWhere website outlines the various parameters that can be used to configure their behaviour. For educators, the recommended type of Smartboard is the default one. The editable Smartboards can be used for interactive lessons, presentations and collaboration. However, other smartboard types, e. g. Image Frame, cannot be edited. It can be helpful if you want to display class schedules or additional "static" information.
To put a smartboard into a space, simply direct the red 3D crosshair toward a suitable surface and initiate the MaxWhere menu by right clicking your mouse. Then, select the window symbol to access the "Add new smartboard (+)" button, which generates new smartboards. A "New Board" panel will then appear, allowing you to define various characteristics of the new Smartboard.
In MaxWhere, projects are the primary means of organising and presenting 2D content within 3D spaces. Users with Editor privileges can create new projects and customise their properties, including their name, description, and content. They can also add Smartboards with custom content and properties to their projects.
Creators of projects can choose to make them public or private, and can grant viewer or editor privileges to specific users. This allows for control over who can access and edit the projects they have created.
Typically, projects created within a 3D space will belong to that space, but they can also be managed and accessed from different locations based on their configuration.
The Project Explorer, a 2D file manager accessible through the MaxWhere menu, displays all projects visible to the currently logged-in user by default. Additionally, specific projects can be listed on any Selection Panels within the space.
In each space, it is possible to set a route that the owner of the space considers best. For example, in an educational space, you can determine in what order the Smartboards should be viewed. This function is called a 'Guided Tour'.
Click the right mouse button to enter the 2D menu. Select the guided tour and click on Create a new tour. Name your tour and add the steps of the tour. Navigate in the space according to the route you wish to present, and MaxWhere will record it.
Download MaxWhere for free and try the spaces labelled with education. After purchasing the space, you will have your copy, which you can customise based on your needs and workflows.
MaxWhere – a digitális generációk oktatási platformja
A 2000 után született nemzedékek (Z és Alfa generáció), azaz akik jelenleg az általános, középiskolák, sőt egyetemek padjaiban ülnek, már a digitális korszakban születtek, így már nem csak adaptálódnak az új technológiákhoz, hanem egyenesen igénylik azokat. A tech az új ötödik érzékük, amit az is bizonyít, hogy egy kutatás szerint a fiatalok előbb válnának meg az ízlelésüktől, mint a kütyüktől. Ebbe pedig a VR/AR/XR is beletartozik. Egy 2000 után született ember legalább kétszer valószínűbben válik VR-eszköz vásárlójává, mint egy korábbi születésű. Ráadásul számukra az élmények megszerzése fontosabb, mint a fizikai tárgyak birtoklása, azaz élményekre fognak költeni, és azokra szánnak több időt és erőfeszítést. Számukra különösen fontosak a szenzoros ingerek, éppen ezért akkor köthetjük le a figyelmüket, ha valami immerzív dologgal próbálkozunk. A VR-on keresztül megszerzett információkat könnyebben dolgozzák fel, és könnyebben is jegyzik meg. Miközben még élvezik is a folyamatot!
A gamifikáció a modern oktatás fontos eszköze, amelynek során játékmechanizmusokat és játékelemeket alkalmazunk olyan folyamatokban, amelyek főként a digitális generációkat már nem feltétlenül kötik le. A gamifikáció által a tanulás érdekesebb, szórakoztatóbb, izgalmasabb.
Az oktatók, trénerek, tanárok értelemszerűen az Y, Z és Baby Boomer generáció gyermekei, akik közül sokaknak már szintén anyanyelvévé vált a technológia, de inkább a 2D-s operációs rendszerek és szoftverek, akár PC-ről, akár érintőképernyős eszközről elérve. A legtöbb oktatónak rendszerint kevés ideje és lehetősége van modern technológiai továbbképzésekre. Mi a MaxWhere-nél azt tűztük ki célul, hogy oktató és diák számára egyaránt élvezetes és könnyen megtanulható felületet hozunk létre, ahol a tanulás a modern generációs igényeknek megfelelően valósulhasson meg. Ehhez pedig a megfelelő támogatást, betanítást is biztosítjuk. Ez a cikk ezt a célt szolgálja.
A MaxWhere segítségével az oktatók és a diákok közötti generációs szakadék tehát áthidalható: a MaxWhere bevált, megszokott felhasználói felületet használ az oktatók kényelme érdekében, miközben lehetővé teszi a diákoknak az élményalapú, immerzív információszerzést egy 3D-s térben. Mindezt drága VR-eszközök használata nélkül.
MaxWhere: költséghatékony VR-megoldás az oktatáshoz
A MaxWhere virtuális oktatási környezete meglepően költséghatékony, mivel nem igényel új hardvert. Eszközigénye megfelel egy erősebb átlagos irodai gépének, és segítségével megtakaríthatjuk a drága szimulációs berendezések beszerzésének és esetleges állagromlásának költségeit. Ugyanis a MaxWhere számos tantárgyhoz, tudományterülethez nyújt szimulációs tereket és laboreszközöket, amelyek köre egyre bővül. Természetesen megkereséseket is szívesen fogadunk. Nemrég egy Erasmus+ pályázat keretében készítettünk el egy 3D nyomtatást szimuláló teret. A lehetőségek száma végtelen.
A tudásmegosztás új módja
Miért olyan hatékony a MaxWhere az oktatás terén is? Egy hagyományos online kurzus úgy zajlik, hogy az oktató e-mailben elküldi a diákoknak a tananyagot több fájl formájában, vagy esetleg feltölti ezeket például Microsoft Teams-re. Majd megtartja az online órát, amely alatt a diáknak el kell kattintania a videóról, ha az írásos tananyagot is nézni szeretné. Ez egy folyamatos multitaskolást eredményez, ráadásul ha sok fájlt használunk, akkor ezek között egyre nehezebb rendet tenni. A MaxWhere lehetővé teszi, hogy egy térben egyszerre a szemünk előtt legyen minden szükséges anyag, beleértve a videochat felületét is. Így a diák a tanulási flow-nak megfelelően halad előre a térben, és mindig megtalálja a szükséges anyagokat. Ezt a flow-t az oktató is kialakíthatja, de a hallgató a saját igényeire is szabhatja. Így ugyanazt a teret akár száz diák százféle módon rendezhet be a saját igényeinek megfelelően, amit a tanár (ha akarja) felülbírálhat.
Fájlok sokasága helyett tehát elég megosztani egy virtuális tér linkjét, amely értékes oktatási anyagokkal, webalkalmazásokkal, dokumentumokkal és videókkal van berendezve, amelyek elősegítik a megértést és a hosszú távú memorizálást.
Ki szerkesztheti a tereket?
Bárkinek lehet saját tere, amit vagy egy meglevő tér lemásolásával és berendezésével szerezhet meg, vagy akár saját teret is készíttethet a MaxWhere csapatával. Az igényekkel kapcsolatban elérhetők vagyunk a honlapon is. Egy tér szerkesztésére és megtekintésére különféle jogosultságok léteznek, így ha létrehoztuk a saját kurzusunkat, akkor oda úgy hívhatunk meg akár kollégákat, akár diákokat, hogy ők vagy csak korlátozottan, vagy egyáltalán nem tudják módosítani a teret és tartalmát. Ráadásul külön lehet beállítani a terek, és külön az ún. Projektek jogosultságait, így ha a diákoknak bizonyos tartalmakat személyre kell szabniuk, vagy például házi feladatokat kell feltölteniük, azt megoldhatják anélkül, hogy például az oktatási célú Smartboardokat szerkeszteni tudnák. Erről bővebben a felhasználói kézikönyvben lehet olvasni.
Milyen tantárgyakat és kurzusokat lehet oktatni MaxWhere-ben?
Arra, hogy milyen órát lehet tartani MW-ben, a legpontosabb válasz: bármilyet. A frontális oktatástól, melynek során Smartboardokon írásos, képi, hangos és videós tartalmakat tudunk elhelyezni, a frontális élő oktatásig (ekkor a Smartboard a videochat megjelenítésére szolgál), sőt a szimulációkig és laborgyakorlatokig valóban bármilyen ismeretbővítés és készségfejlesztés elképzelhető. Az ún. Guided tour segítségével végigkísérhetjük a diákot egy adott információs folyamaton, legyen az egy kémiai kísérlet vagy akár egy történelmi korszak eseményei.
A MaxWhere-ben folyó oktatás két nagy előnye, hogy egy virtuális térben áll rendelkezésre minden információ, és minden feladatot is itt kell elvégezni. Azaz a diákoknak nem kell ablakok között váltogatni, ami különösen a fiatalabb generációkra az immerziót erősen csökkentő hatással bírna. A másik nagy előny a kollaboráció. A közös tér lehetővé teszi, hogy a tanulók ugyanazon a dokumentumon dolgozzanak valós időben. Nem szükséges fájlokat küldeni, elég csak megnevezni a tér adott részét, ahol a dokumentum található, és a diákok nem vesznek el a fájlverziók rengetegében. Az oktató számára nagy előny, hogy egy helyen rendszerezetten látja a hallgatói összes anyagát, és nem kell e-mailekből keresgélnie a csatolmányokat, majd rendezgetni azokat. Emellett nem csak a végeredményt látja, hanem azt is, hogy milyen folyamatokon megy végig a diák, mire elkészül egy projekttel.
Hogyan kezdj neki?
A MaxWhere Felhasználói kézikönyv segít a kezdeti lépésektől a profi felhasználói műveletekig. Ha ellenőriztük, hogy a számítógépünk megfelel-e a rendszerkövetelményeknek, töltsük le a szoftvert a MaxWhere weboldal Letöltés menüpontjából (a letöltési link a főoldalon is elérhető). Miután telepítettük a szoftvert a szokásos módon, felugrik egy ablak, hogy regisztráljunk fiókot. Ehhez azért van szükség, hogy saját teret tudjunk létrehozni, és menteni tudjuk annak beállításait és tartalmát.
Belépés után egy olyan felületre jutunk (ez az úgynevezett Térválasztó vagy Space Browser), ahol egyelőre Demo tereket láthatunk. Érdemes ezeken kipróbálni a navigációt (itt leírjuk részletesen), valamint az okostáblák kezelését és fajtáit (itt olvasható minden tudnivaló). Itt láthatunk még nyílt hozzáférésű tereket is, amelyekből inspirálódhatunk, vagy akár tanulhatunk is. Amennyiben rendelkezünk MaxWhere-előfizetéssel, akkor saját teret birtokolhatunk, amelyet a magunk igényei szerint alakíthatunk.
A Free Plan, azaz ingyenes csomag tehát a Demo tereket és a publikus láthatóságú tereket teszi elérhetővé. Ezzel a csomaggal a Demo terekbe 50 MB-ig tölthetünk fel tartalmakat, ami azt is jelenti, hogy a terek okostábláit a saját ízlésünk szerint rendezhetjük be webes és a saját gépünkről feltöltött tartalmakkal.
Az Individual Plan révén a felhasználónak 1 db saját tere lesz (amelyet valamelyik Demo tér klónozásával szerezhet meg – ez két kattintás). Ebben a csomagban már az is benne van, hogy a tér tulajdonosa 20 további felhasználót hívhat meg a terébe tetszőleges jogosultsági szinttel, és a térbe 20 GB kvótáig tölthet fel (ő vagy a meghívottak) tartalmakat.
Több más csomag is rendelkezésre áll annak megfelelően, hogy a tereink számát, a feltölthető adatmennyiséget vagy a meghívható felhasználók számát kívánjuk-e növelni.
Hogyan szerkeszthetjük a terek tartalmát?
Fontos, hogy a MaxWhere rendszernek három pillére van: a MaxWhere desktop kliens, a MaxWhere webes nézegető és a MaxWhere Portál. A desktop klienst már letöltöttük az előző bekezdésben, de vannak terek, amelyek webes nézegetőben is rendelkezésre állnak. Azaz letöltés nélkül, egy egyszerű webböngészőben is élvezheti a VR előnyeit. Ezek a Térválasztó felületén az információs kártyájukon egy WEB címkét viselnek, és ha rájuk kattintunk, a rendszer meg is kérdezi, hogy weben vagy a desktop kliensen akarjuk-e megnyitni őket. A MaxWhere Portál a terek beállításaira alkalmas adminisztrációs felületünk. Erre azoknak van szükségük (így például oktatóknak), akik a tér tulajdonosai vagy adminisztrátorai, és szerkeszteni akarják akár az adott tér láthatóságát, elérhetőségét, jogosultságait, metaadatait (nevét, leírását, bélyegképét, láthatóságát, megosztását, stb.), akár a térben elérhető tartalmakat.
A saját tereinkben a Smartboardokat és az azokat összefogó projekteket is szerkeszthetjük. A MaxWhere-terekben létrehozhatunk projekteket, amelyeknek a célja, hogy a terekben megjelenő objektumokat, elsősorban a Smartboardokat csoportosítsa, ezáltal az oda feltöltött tartalmakat könnyen elérhetővé és módosíthatóvá tegye. Minden projekt egy adott térhez kapcsolódik, tehát például ha van egy kémiai és egy biológiai terünk, akkor természetesen a biológiai tananyag nem keveredik bele a kémiai kurzus terébe. A projektek szerkesztésében segít ez a videó is. Hozzátesszük: ha csak egy tér áll rendelkezésünkre, abban akár többféle kurzust is lehet tartani, hiszen a tartalom és annak elrendezése szabadon változtatható.
Terek inspirálódáshoz
Mely tereket ajánljuk kipróbálásra oktatók számára? Először is a Demo terek közül a Demo Education Space-t, amely kiválóan alkalmas a kezdő felhasználók számára a navigáció elsajátítására, valamint arra, hogy egyszerű információs flow-t hozzunk létre. Oktatóként az okostáblákon elhelyezhetjük egy online Teams-óra elérhetőségét, az órához szükséges tananyag fájljait, valamint például megnyithatunk egy weboldalt, amely a tananyaghoz kapcsolódik.
A Térválasztóban rákattinthatunk az Education kategóriára is, ekkor számos nyilvános tér tárul elénk. Itt több olyan impozáns épület leképezését találjuk, amelyekben az okostáblák lehetővé teszik az együttműködést vagy egy információs folyam hatékony feldolgozását. Számos olyan teret is találunk, amely egy oktatási intézmény vagy konferencia számára jött létre. Sőt, mindenki számára elérhető az interaktív 3D szimulációs tér (3D Printing Workshop), amelyet szívesen ajánlunk minden informatikatanárnak, sőt más diszciplínák oktatóinak is. Ennek használatáról bővebben itt lehet olvasni.
Segít a MaxWhere support
Már említettük, hogy elérhető egy teljes körű Felhasználói kézikönyv, valamint a MaxWhere YouTube-csatornáján is számos videós segédanyag található a MaxWhere használatáról, a terek tartalmának szerkesztéséről, és így tovább. Ha ezek sem adnák meg a választ a felmerülő kérdésre, esetleg a felhasználónak fejlesztési javaslata volna, azt a https://www.maxwhere.com/support felületen jelentheti be. Szívesen látjuk az esetleges bugok bejelentését és akár az ötleteket is. A MaxWhere fejlesztése folyamatosan zajlik a felhasználók bevonásával. Évek óta használjuk magunk is főként a felsőoktatásban számos egyetemen, a legkülönfélébb kurzusokon, és a tapasztalatainkat beemeljük a későbbi fejlesztendő területek közé.
Hogyan könnyíti meg a MaxWhere a digitális workflow-t?
A jelenlegi és egykori hallgatók, akik akár egész féléveken keresztül tanultak MaxWhere-ben, lelkesen idézik fel az inspiráló 3D-s tanulási tereket. Ezek a környezetek 50%-kal mélyebb, koncentráltabb információfeldolgozást tesznek lehetővé, miközben 30%-kal felgyorsítják a projektmunkát. Ha már a projektmunkánál tartunk, a MaxWhere nem csak a szorosan vett oktatást, hanem más iskolai munkafolyamatokat is megkönnyít. Sok oktató panaszkodik arra, hogy a munkája jelentős adminisztratív terheléssel jár. A kurzusok adatainak rögzítése, a jegyadás mind-mind olyan folyamat, amelynek során a felhasználó előtt számos ablak van megnyitva, így nagy a hibázás veszélye. Ha egy térben, a munkafolyamatnak megfelelően rendezzük el a szükséges ablakokat (így például a dolgozatokat, a ponthatárok táblázatát, a Neptunt vagy a Krétát, és így tovább), akkor sokkal kevesebb üresjárattal kell megküzdenünk a kattintgatás miatt - és gyorsabban, kevesebb hibával oldhatjuk meg az oly nagyszerű tanári munka kevésbé inspiráló velejáróit is.
MaxWhere - the educational platform for digital generations
The generations born after 2000 (Generation Z and Alpha), i.e. those who are currently sitting on the benches of primary, and secondary schools and even universities, were already born in the digital age, so they no longer adapt to new technologies but directly demand them. Tech is their new fifth sense, which is also proven by the fact that, according to a study, young people would rather get rid of their sense of smell than technology and devices. This includes VR/AR/XR. A person born after 2000 is at least twice as likely to become a VR device buyer as someone born earlier. In addition, gaining experiences is more important than owning physical objects; that is, they will spend more on experiences and devote more time and effort to them. Sensory stimuli are particularly important to them, so we can capture their attention when we try something immersive. Information obtained through VR is easier to process and remember, giving them more fun!
Gamification is an essential tool of modern education. During the gamified lecture, we use game mechanisms and game elements in processes that are no longer necessarily binding, especially for digital generations. Gamification makes learning more interesting, fun and exciting.
The instructors, trainers, and teachers are the children of the Y, Z and Baby Boomer generations, many of whom have already become their mother tongue with technology, but rather with 2D operating systems and software accessed from a PC or a touch-screen device. Most educators usually need more time and opportunity for modern technological training. At MaxWhere, we have set ourselves the goal of creating an enjoyable and easy-to-learn interface for both instructors and students. Learning can take place following the needs of the modern generation. And for this, we also provide the appropriate support and training. This blog serves that purpose. With the help of MaxWhere, MaxWhere can bridge the generation gap between teachers and students: the platform uses a proven, familiar user interface for the comfort of teachers while enabling students to acquire experience-based, immersive information in a 3D space. All this without the use of any expensive VR equipment.
MaxWhere: a cost-effective VR solution for education
MaxWhere's virtual learning environment is cost-effective as it requires no new hardware. Its equipment requirements correspond to those of a more powerful average office notebook. With its help, you can save the purchase costs and the possible amortization of expensive simulation or lab equipment. MaxWhere provides simulation spaces and lab tools for many subjects and fields of science, and their range is constantly expanding. Of course, we also welcome inquiries. We recently created a space simulating 3D printing as part of an Erasmus+ grant. The possibilities are endless.
A new way of knowledge sharing
Why is MaxWhere so effective in education? A traditional online course takes place in such a way that the instructor sends the course material to the students by e-mail attaching several files, or uploading them to, for example, Microsoft Teams. Then they hold the online class, during which the student must click on several files and windows. This results in continuous multitasking, and if we use many files, it becomes more and more difficult to organize them. MaxWhere makes it possible to have all the necessary material in front of our eyes simultaneously in one space, including the video chat interface. Thus, the student moves in the space according to the learning flow and always finds the necessary materials. The instructor can create this flow, but the students can also tailor it to their own needs. In this way, up to a hundred students can arrange the same space in a hundred different ways according to their own needs, which the teacher (if he wants) can override.
So instead of a multitude of files, you can share a link to a virtual space furnished with valuable educational materials, web applications, documents, and videos that promote understanding and long-term memorization.
Who can edit spaces?
Anyone can have their own space, which you can obtain by copying and furnishing an existing space, or you can even have your own space created by the MaxWhere team. We are available for requests at https://www.maxwhere.com/support. There are various permissions for editing and viewing a space, so if you have created your course, you can invite colleagues or students there so that they can only modify the space and its content to a limited extent or not at all. In addition, the spaces can be set separately, so that if students need to customize certain content or, for example, upload homework, they can do so without being able to edit educational SmartBoards. You can read more about this feature in the user manual.
What subjects and courses can be taught in MaxWhere?
The technology allows any class to take place on the platform as all kinds of written, visual, audio and video content can be placed on SmartBoards. In live teaching scenarios, the SmartBoard is used to display video chat. This makes MaxWhere an excellent platform for simulations and laboratory exercises, enabling knowledge expansion and skill development in an immersive environment. With the help of the Guided Tour function, educators can accompany the student through a specific information flow, be it a chemical experiment or even a historical era.
Two significant advantages of education in MaxWhere are that all information is available in a virtual space, and all tasks can be completed here. In other words, students do not have to switch between windows and tabs, which would have a significant immersion-reducing impact on the younger generations. Another big advantage is collaboration. Shared spaces allow students to work on the same document in real-time. It is optional to send files, it is enough to name the specific part of the space where the document is located, and the students will not get lost in the multitude of file versions. Another advantage for the instructors is that they can see all their students' materials in one place and do not have to search for attachments in e-mails and organize them. In addition, they can track the results and the processes the student goes through before completing a project.
How do you get started?
The MaxWhere User Guide will help you from the initial steps to professional user operations. If you have checked whether your computer meets the system requirements, download the software from the Download menu of the MaxWhere website (the download link is also available on the main page). After installing the software, a window will pop-up to register an account. This is necessary so that you can create your own space and save its settings and content.
After logging in, you will be taken to an interface (the so-called Space Browser) where you can see Demo spaces. It is worth trying the navigation and smartboard editing tips (you can read all the information here). Here you can also see open-access spaces from which we can be inspired or even learn. If you have a MaxWhere subscription, you can have your own space, which you can customize according to your needs.
The Free Plan makes the Demo spaces and publicly visible spaces available. In this package, you can upload up to 50 MB of content to the Demo spaces. You can arrange the SmartBoards of the spaces according to your taste with content uploaded from the web and your computer. With the Individual Plan, you will have one own space (which can be obtained by cloning one of the Demo spaces - it's two clicks). This package already includes the fact that the space owner can invite 20 additional users to his space with any permission level, and they can upload up to a 20 GB quota of content to the space. Several other packages are available depending on whether we want to increase the number of spaces, the amount of data that can be uploaded, or the number of users that can be invited.
How can we edit the content of the spaces?
It is important that MaxWhere system has three pillars: the MaxWhere desktop client, the MaxWhere web viewer and the MaxWhere Portal. We have already downloaded the desktop client in the previous paragraph, but there are spaces that are also available in a web viewer. Yes, you can enjoy the benefits of VR in a simple web browser without downloading anything. These have a WEB label on their information card on the Space Browser interface, and when you click on them, the system asks if you want to open them on the web or on the desktop client. The MaxWhere Portal is our administrative interface for the settings of the spaces. This is needed by those (such as teachers) who are the owners or administrators of the space and want to edit the visibility, availability, permissions, and metadata (name, description, thumbnail, visibility, sharing, etc.) of the spaces.
You can also edit the Smartboards and the projects that connect them in your spaces. We can create projects in MaxWhere spaces. This makes it easier to group the objects appearing in the spaces, primarily Smartboards, making the uploaded content easily accessible. Each project is related to a specific space. For example, if you have a chemistry and a biology space, then the biology curriculum does not get mixed up in the space of the chemistry course. This video also helps in editing projects. We would like to add: if we only have one space available, several courses can be held in it, since the content and its layout can be changed freely.
Spaces for inspiration
Which spaces do we recommend for trainers to try out? First of all, from the Demo spaces, choose the Demo Education Space. It is excellent for novice users to learn navigation and to create a simple information flow. As an instructor, we can place the availability of an online Teams class, the course material files required for the class, and open a website linked to the course material on the smartboards. In the Space Selector, you can also click on the Education category, then you will see a number of public spaces. Here you can find the mapping of several impressive buildings in which smartboards enable collaboration or the efficient processing of an information stream. You may find spaces that were created for an educational institution or conference. The interactive 3D simulation space (3D Printing Workshop) is available to everyone, and we are happy to recommend it to all IT teachers and even to teachers of other disciplines.
Got a Question? MaxWhere support can help
We've already mentioned that there's a full User Guide available, and MaxWhere's YouTube channel also has several video tutorials on how to use MaxWhere, edit the content of spaces, and more. If these do not answer your question, or if you have a suggestion for improvement, you can report it here. We welcome any bug reports and even ideas. MaxWhere is constantly being developed with the involvement of users. We have been using it ourselves for years, mainly in higher education at many universities, on various courses.
How can MaxWhere facilitate the digital workflow?
Current and former students who have studied using MaxWhere (in some cases full semesters) enthusiastically recall the inspiring 3D learning spaces. These environments enable 50% deeper, more focused information processing while speeding up project work by 30%. MaxWhere facilitates not only strict education, but also other work processes in a school. Many educators complain that their work entails a significant administrative burden. Recording course data and issuing tickets are all processes in which many windows are open on your screen, so there is a high risk of making mistakes. You can save time and unnecessary 'clicking' if you arrange the necessary windows in one space, according to the workflow (for example, tests, the table of point limits, and so on). Thanks to MaxWhere, you deal with much less idle time and solve tasks faster and more effectively - giving you more energy to focus on the most important activity of all: teaching.
MaxWhere a digitális oktatás szolgálatában - és még tovább
A digitális vagy IKT-kompetenciák fejlesztése az Európai Unió kiemelt stratégiai célja, hiszen a korszerű eszközökhöz értő felnőttek könnyebben boldogulnak a munkaerőpiacon, ami hosszú távon a régiók fejlesztésével is szorosan összefügg. Számos nemzetközi projekt segíti a közoktatást a diákok alapszintű és szakmai digitális tudásának fejlesztésében. A közoktatási intézményekből ma már a legtöbb esetben nem hiányoznak a számítógépek, tabletek. Főként a pandémia óta még a hátrányos helyzetű térségekbe is eljutottak (még ha nem feltétlenül elegendő számban is) tabletek, okostelefonok, laptopok. Az ezeken megvalósítható élményszerű oktatás kulcsfontosságú eszköze a készségfejlesztésnek. A cselekvéses tanulás (learning by doing) elmélete szerint a diáknak a gyakorlatban kell megtapasztalnia egy adott tudáselem működését, hogy tartós ismeretbővülés és készségfejlődés következzen be. Ha azonban az adott dolog nem (vagy csak nehezen) elérhető, szimulációs megoldások állnak rendelkezésre. Ilyen szimulációt kínál a MaxWhere a 3D Printing Workshop terével, amely bárki számára hozzáférhető, ráadásul böngészőből is elérhető.
A STEAM Upgrade projekt
A MaxWhere alapítói és fejlesztői között számos egyetemi oktatót, oktatástechnológiai szakembert találunk. Így egyértelmű, hogy a társadalmi felelősségvállalás részeként a MaxWhere csapata elkötelezett az oktatási alkalmazások fejlesztése mellett. Így csatlakoztunk a Tallinni Egyetem és a linzi Johannes Kepler Egyetem felkérésére az ún. STEAM Upgrade projekthez, amelynek egyik fókusza a 3D nyomtatás mint tartalom kidolgozása a STEAM (Science, Technology, Arts and Mathematics) képzésekben. A munkacsoport tagja még a Craftbot, közismert 3D nyomtatók gyártója is.
A STEAM Upgrade projekt célja egy digitális kompetenciafejlesztési rendszer létrehozása a STEAM tantárgyak tanulásához az alap- és középfokú oktatás körében, amelynek része egy szabadon hozzáférhető tudásbázis és egy virtuális STEAM laboratórium is.
Ennek jegyében a linzi egyetem arra kérte fel a MaxWhere csapatát, hogy egy interaktív virtuális térben mutassuk be a 3D nyomtatás folyamatát, és szimuláljuk egy 3D nyomtató működését. A MaxWhere 3D Printing Workshop térben szimulált nyomtató egy Creality Ender 3, a világ egyik legjelentősebb 3D-nyomtatógyártója által fejlesztett berendezés üzemelését mintázza, de az azonos működési elv miatt az itt megszerzett tudás bármely más nyomtatónál is alkalmazható.
A térbe belépve egyrészt smartboardokat látunk. Ezeken a 3D nyomtatás legfontosabb alapismereteit láthatjuk: a 3D nyomtatás történetétől a mai nyomtatók működési elveiig. A tér középpontjában pedig egy Creality Ender 3 nyomtató virtuális ikerpárja található egy egyszerű kezelőpanellel. Azért ezt a modellt választottuk, mert ez gyakori, népszerű és hozzáférhető, így aki a későbbiekben “tényleges” 3D nyomtatóval dolgozna, annak az eszköz már ismerős lesz.
A tér sikeres betöltése után a következő lépésekkel kezdhetjük meg a nyomtatást:
közelítsünk a nyomtató kijelzőjéhez, és válasszuk ki a Tallózás gombot
a fájlböngésző ablakban kiválaszthatjuk a nyomtatni kívánt gcode fájlt
blogcikkünk alján mi is ajánlunk két gcode fájlt, amellyel bárki kipróbálhatja a nyomtatószimulátort
kattintsunk a start gombra
a nyomtató elindítja a munkát
A tér teljes mértékben testre szabható. Egyrészt a szerkesztési jogosultsággal rendelkező felhasználók módosíthatják a smartboardok tartalmát, másrészt a 3D nyomtató működése is szemléltethető bármilyen gcode fájl importálásával, amely az Ender 3 nyomtatóhoz készült.
A linzi Johannes Kepler Egyetem oktatásmódszertani doktori iskolájában évente százak tanulnak a világ minden tájáról. Ezen kívül számos workshopot, konferenciát rendeznek. Így a doktoranduszok széles körében válhat ismertté a MaxWhere részvételével zajló projekt, aminek közvetett hatása lehet még, hogy ösztönözheti számos más élményalapú tanulási, szimulációs projekt létrejöttét. Az oktatásban a virtualizációs megoldások szerepe egyébként egyre nő, így különösen fontos, hogy ezeket tudományos megalapozottsággal fejlesszék, majd szakértők validálják.
A 3D nyomtatási szimulációs tér értéke az oktatásban
A tér egyszerre szolgál közoktatási és ismeretterjesztő célokat. Egy “igazi” 3D nyomtató üzemeltetése, karbantartása és esetleges javítása magas költséggel, sok idő ráfordításával járhat, és olyan ismeretanyag kell hozzá, amivel egy általános képzettségű tanító vagy tanár nem feltétlenül rendelkezik. Egy belépő szintű 3D nyomtató ára, valamint a működtetéshez szükséges anyagok költsége a legtöbb iskola számára túl magas lenne, amihez hozzáadódik, hogy a nyomtató üzemeltetéséhez szükséges szaktudás nem áll minden intézményben rendelkezésre.
A MaxWhere 3D Printing Workshop teret bárki megnyithatja, majd beviheti a tanórájára, és megismertetheti a diákokkal a 3D nyomtatás eljárását. A virtuálisan kinyomtatott tárgyaknak köszönhetően így a tanulás élményszerű és szórakoztató lesz. Az oktatótér a fejlesztés végeztével publikussá tehető, így bárki használhatja.
A tanulás nem ér véget az objektum kinyomtatásánál: a diákok akár saját maguk is elkészíthetik a kinyomtatandó geometriát, így az egész folyamat az ő kezük alatt bontakozik ki. Érdekes és ingyenes szoftverekkel, mint a Tinkercad és a Kiri:Moto, rövid idő alatt elvégezhető feladat egy kézzel rajzolt 2D kontúr 3D testé alakítása, majd a slice-olás és a nyomtatás elindítása.
A tér értéke a professzionális (ipari, logisztikai) felhasználás számára
A 3D printing szimulációs tér létrehozása magával hozott olyan fejlesztéseket, amelyek a Maxwhere alapképességeit is tovább bővítették. A technológia szimulálása során felmerült kihívások így jóval szélesebb körű fejlődést jelentenek a MaxWhere számára. Lehetségessé vált “valós időben” megjeleníteni a nyomtatás során a filamentből kialakuló háromdimenziós tárgyakat. Ilyen megjelenítési képességre szükség van más additív technológiák vizualizációjában is, de az anyageltávolítás is hasonló módon modellezhető.
MaxWhere at the service of digital education - and more
The development of digital or ICT competencies is a critical strategic goal of the European Union since adults who know how to use modern tools can more easily succeed in the labour market, which is closely related to the region's long-term development. Several international projects help public education develop students' primary and professional digital skills. Nowadays, in most cases, public education institutions have computers and tablets. Especially since the pandemic, tablets, smartphones, and laptops have reached disadvantaged areas (even if not necessarily in sufficient numbers). The experiential education that can be implemented on these devices is a crucial tool for skill development. According to the theory of learning by doing, the student must experience a specific knowledge element in practice to achieve permanent knowledge expansion and skill development. However, if these tools are difficult to reach or implement in educational institutions, simulation solutions are available. MaxWhere offers a simulation with the space of a 3D Printing Workshop, making it accessible to anyone and can also be opened from a browser.
The STEAM Upgrade project
Among the founders and developers of MaxWhere are many university lecturers and educational technology specialists. Thus, as part of social responsibility, the MaxWhere team is committed to developing educational applications. In this spirit, we joined the so-called STEAM Upgrade project at the request of Tallinn University and the Johannes Kepler University of Linz. One of the focuses of STEAM Upgrade project is the development of 3D printing as content in STAM (Science, Technology, Arts and Mathematics) courses. Craftbot, a well-known manufacturer of 3D printers, is also a member of the working group.
The STEAM Upgrade project aims to create a digital competence development system for learning STEAM subjects in primary and secondary education, including a freely accessible knowledge base and a virtual STEAM laboratory.
Thus, the University of Linz asked the MaxWhere team to present the 3D printing process in an interactive virtual space and simulate the operation of a 3D printer. The printer simulated in MaxWhere 3D Printing Workshop models the operation of a Creality Ender 3, a device developed by one of the world's most important 3D printer manufacturers. However, the knowledge gained here can also be applied to any other printer due to the same working principle.
Entering the space, we see smartboards. On these, we can learn the basics of 3D printing: from the history of 3D printing to the operating principles of today's printers. In the center of the space is a virtual twin of a Creality Ender 3 printer with a simple control panel. We chose this model because it is common, popular and accessible, so anyone working with an actual 3D printer will already be familiar with the device.
After successfully loading the space, you can start printing by following these simple steps:
approach the printer display and select the Browse button
in the file browser window, you can select the gcode file you want to print
at the bottom of this article, we also recommend two gcode files with which anyone can try the printer simulator
click the start button
the printer starts the job
The space is fully customisable. On the one hand, users with Editor role can modify the content of the smartboards. On the other hand, the operation of the 3D printer can be illustrated by importing any gcode file that was created for the Ender 3 printer.
The international impact of the 3D simulation project
Every year, hundreds of people from all over the world study at the doctoral school of educational methodology at Johannes Kepler University in Linz. In addition, many workshops and conferences are organised. In this way, the project, with the participation of MaxWhere, can become known to a wide range of doctoral students, which may also indirectly stimulate the creation of many other experience-based learning and simulation projects. The role of virtualisation solutions in education is growing, so it is essential that they are developed with a scientific basis and then validated by experts.
The importance of the 3D printing simulation space in education
The space serves both public education and science communication purposes. The operation, maintenance and eventual repair of a "real" 3D printer can be expensive, time-consuming, and require knowledge that a teacher with general training does not necessarily have. The price of an entry-level 3D printer and the cost of the materials needed to operate it would be too high for most schools. Furthermore, not all institutions have trained staff to handle an actual 3D printer.
Anyone can open the MaxWhere 3D Printing Workshop space, then bring it into their class and introduce students to the process of 3D printing. Thanks to the virtually printed objects, learning becomes experiential and fun. The space can be made public once the development is complete so anyone can use it.
Learning does not end when the object is printed: students can even create the geometry to be printed, so the whole process unfolds under their hands. An easy and short task can be transforming a hand-drawn 2D contour into a 3D figure with interesting and free software like Tinkercad and Kiri:Moto, then start slicing and printing.
The value of the space for professional use: industry, logistics
The creation of the 3D printing simulation space led to developments that further expanded the basic capabilities of Maxwhere. The challenges encountered during the simulation of the technology thus represent a much broader development for MaxWhere. It became possible to display the three-dimensional objects formed from the filament during printing in "real-time". Such display capability is also needed to visualise other additive technologies, but material removal can also be modelled similarly.


.png)
.png)
.png)


